Prepare sounds
Record from the microphone or import an audio file, then shape the waveform and sound.
Official Manual
TXT sampler / TT-404
Version 1.5.1 / Updated 2026-08-11
This manual explains how to record sounds, shape samples, build patterns, save projects, and export audio while checking the actual app screens.
01
Getting started
The same basic workflow applies to iPhone and iPad. Blue numbers on screenshots match the numbered explanations beside or below each image. App control labels are shown in English, such as LOAD SAMPLE.
Record from the microphone or import an audio file, then shape the waveform and sound.
Place sounds in the sequence and play them back as a loop.
Save samples, pad settings, sequences, and BPM, then export finished loops as WAV audio.
Tap the pad that should receive the sound. The selected pad name appears in the waveform area.
Choose an audio file. It will be loaded into the currently selected pad.
If the sound plays after loading, the pad is ready.
02
Screen layout
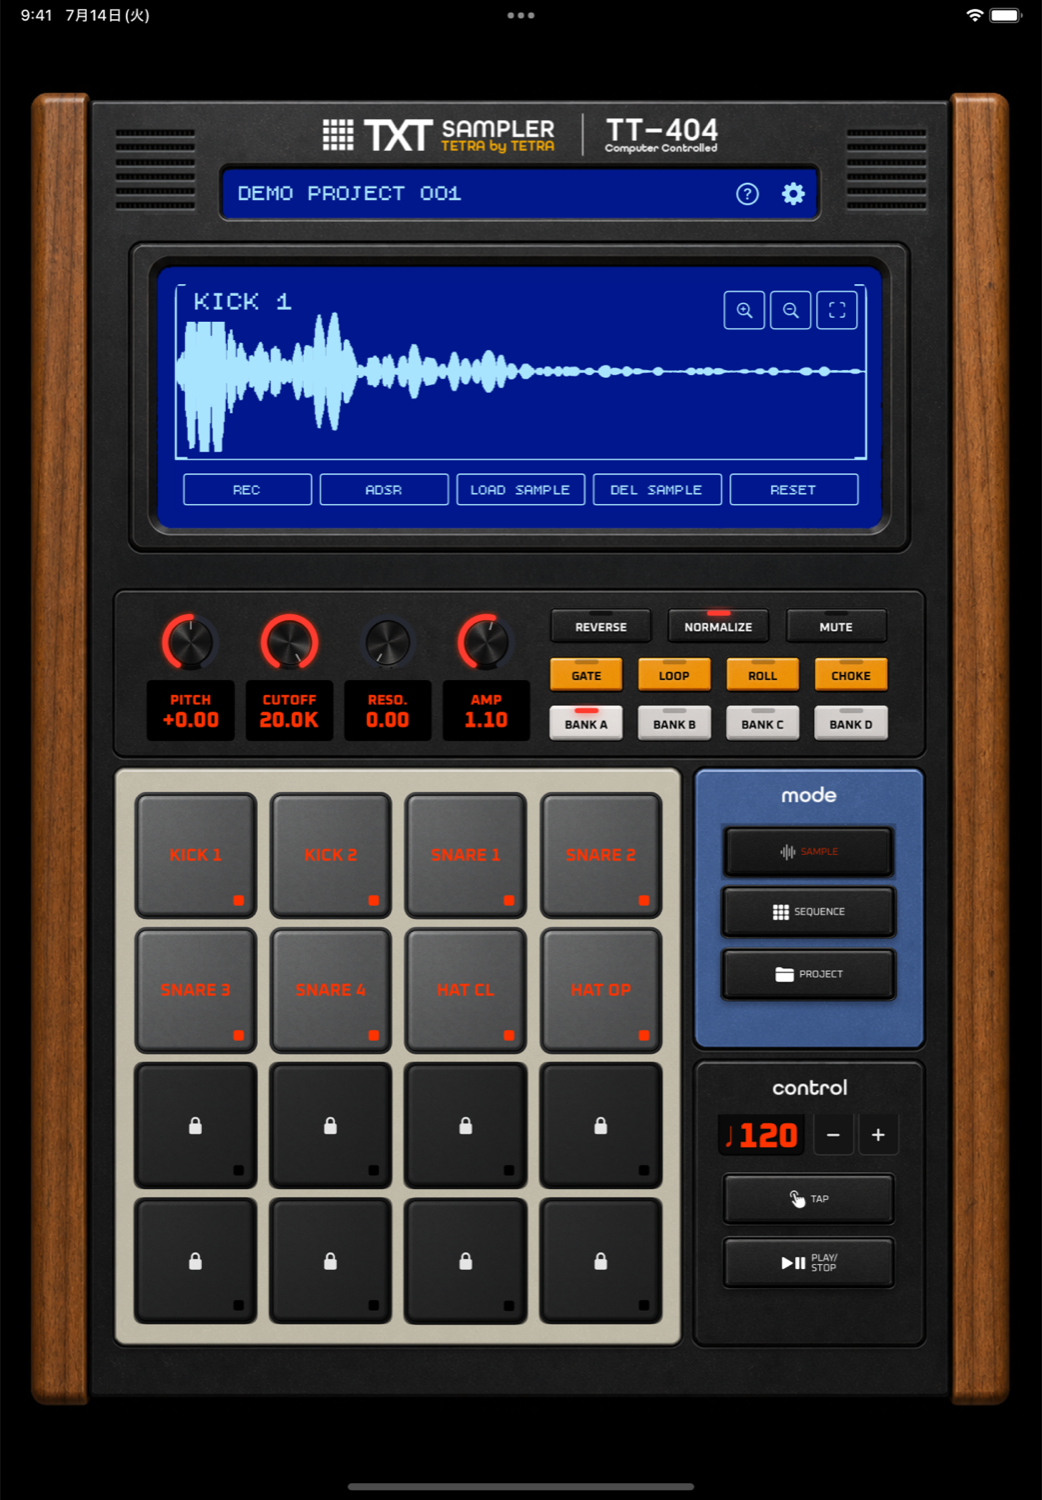
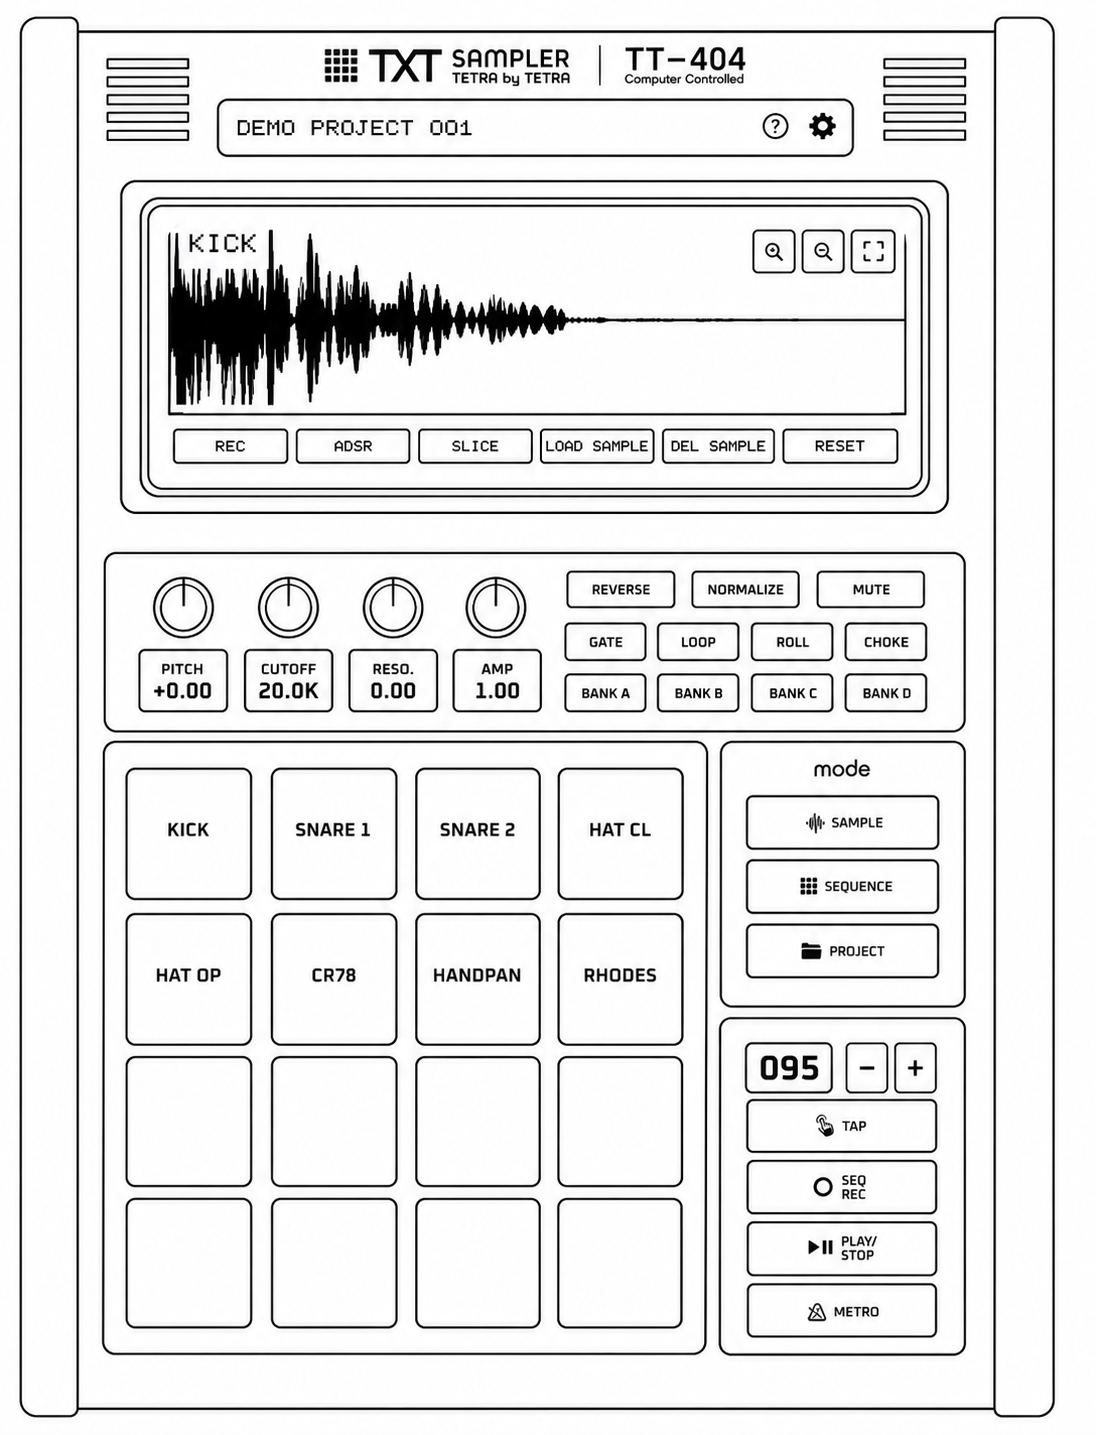
Shows the current project name, help, and settings access. Help lets you choose the online manual or support form.
Shows waveform, sequence, project information, and mode-specific buttons.
Use knobs and switches to shape the selected pad.
Select and play samples. The free plan can use the upper 8 pads in Bank A.
Switch between SAMPLE, SEQUENCE, and PROJECT.
Control BPM, TAP, SEQ REC, PLAY/STOP, and METRO.
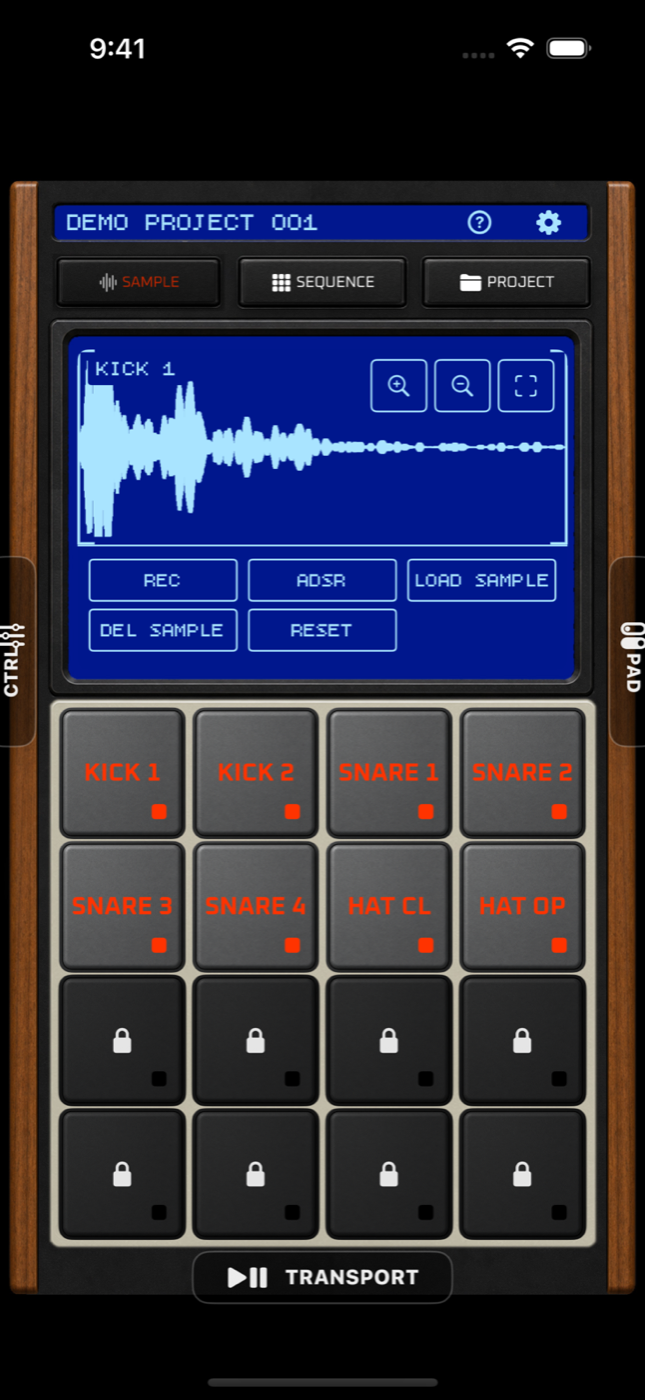
Switch between the three production modes.
Shows the primary controls for the selected mode.
Select and play samples on a 4 x 4 pad grid.
Adjust pitch and filters in SAMPLE mode. In SEQUENCE mode, it controls effects.
Control roll, loop playback, reverse playback, and related pad behavior.
Open playback and stop controls from the bottom of the screen.
| Display mode | Details |
|---|---|
| iPhone dedicated layout | Optimized for iPhone usability and performance. It uses a portrait layout with side and bottom tabs. |
| Scaled iPad layout | Shows the same layout as the iPad version, scaled down to fit the iPhone screen. |
You can choose the display mode on first launch and change it later in Settings > Display Settings.
03
SAMPLE mode
Check the sample name and waveform, then set the playback range with START and END.
Use REC, ADSR, SLICE, LOAD SAMPLE, DEL SAMPLE, and RESET.
Select the pad you want to edit first.
Adjust pitch, filter, volume, and playback behavior.
The free plan can import audio up to 10 seconds. The Premium plan can import audio up to 60 seconds.
After you choose “Record,” the original sample is replaced only when you later choose “Use this recording.”
Move START and END on the waveform to show TRIM. Running TRIM overwrites the sample with the current range.
Duplicate the project first if you need a backup. Pad settings such as pitch and ADSR are kept.
04
SLICE
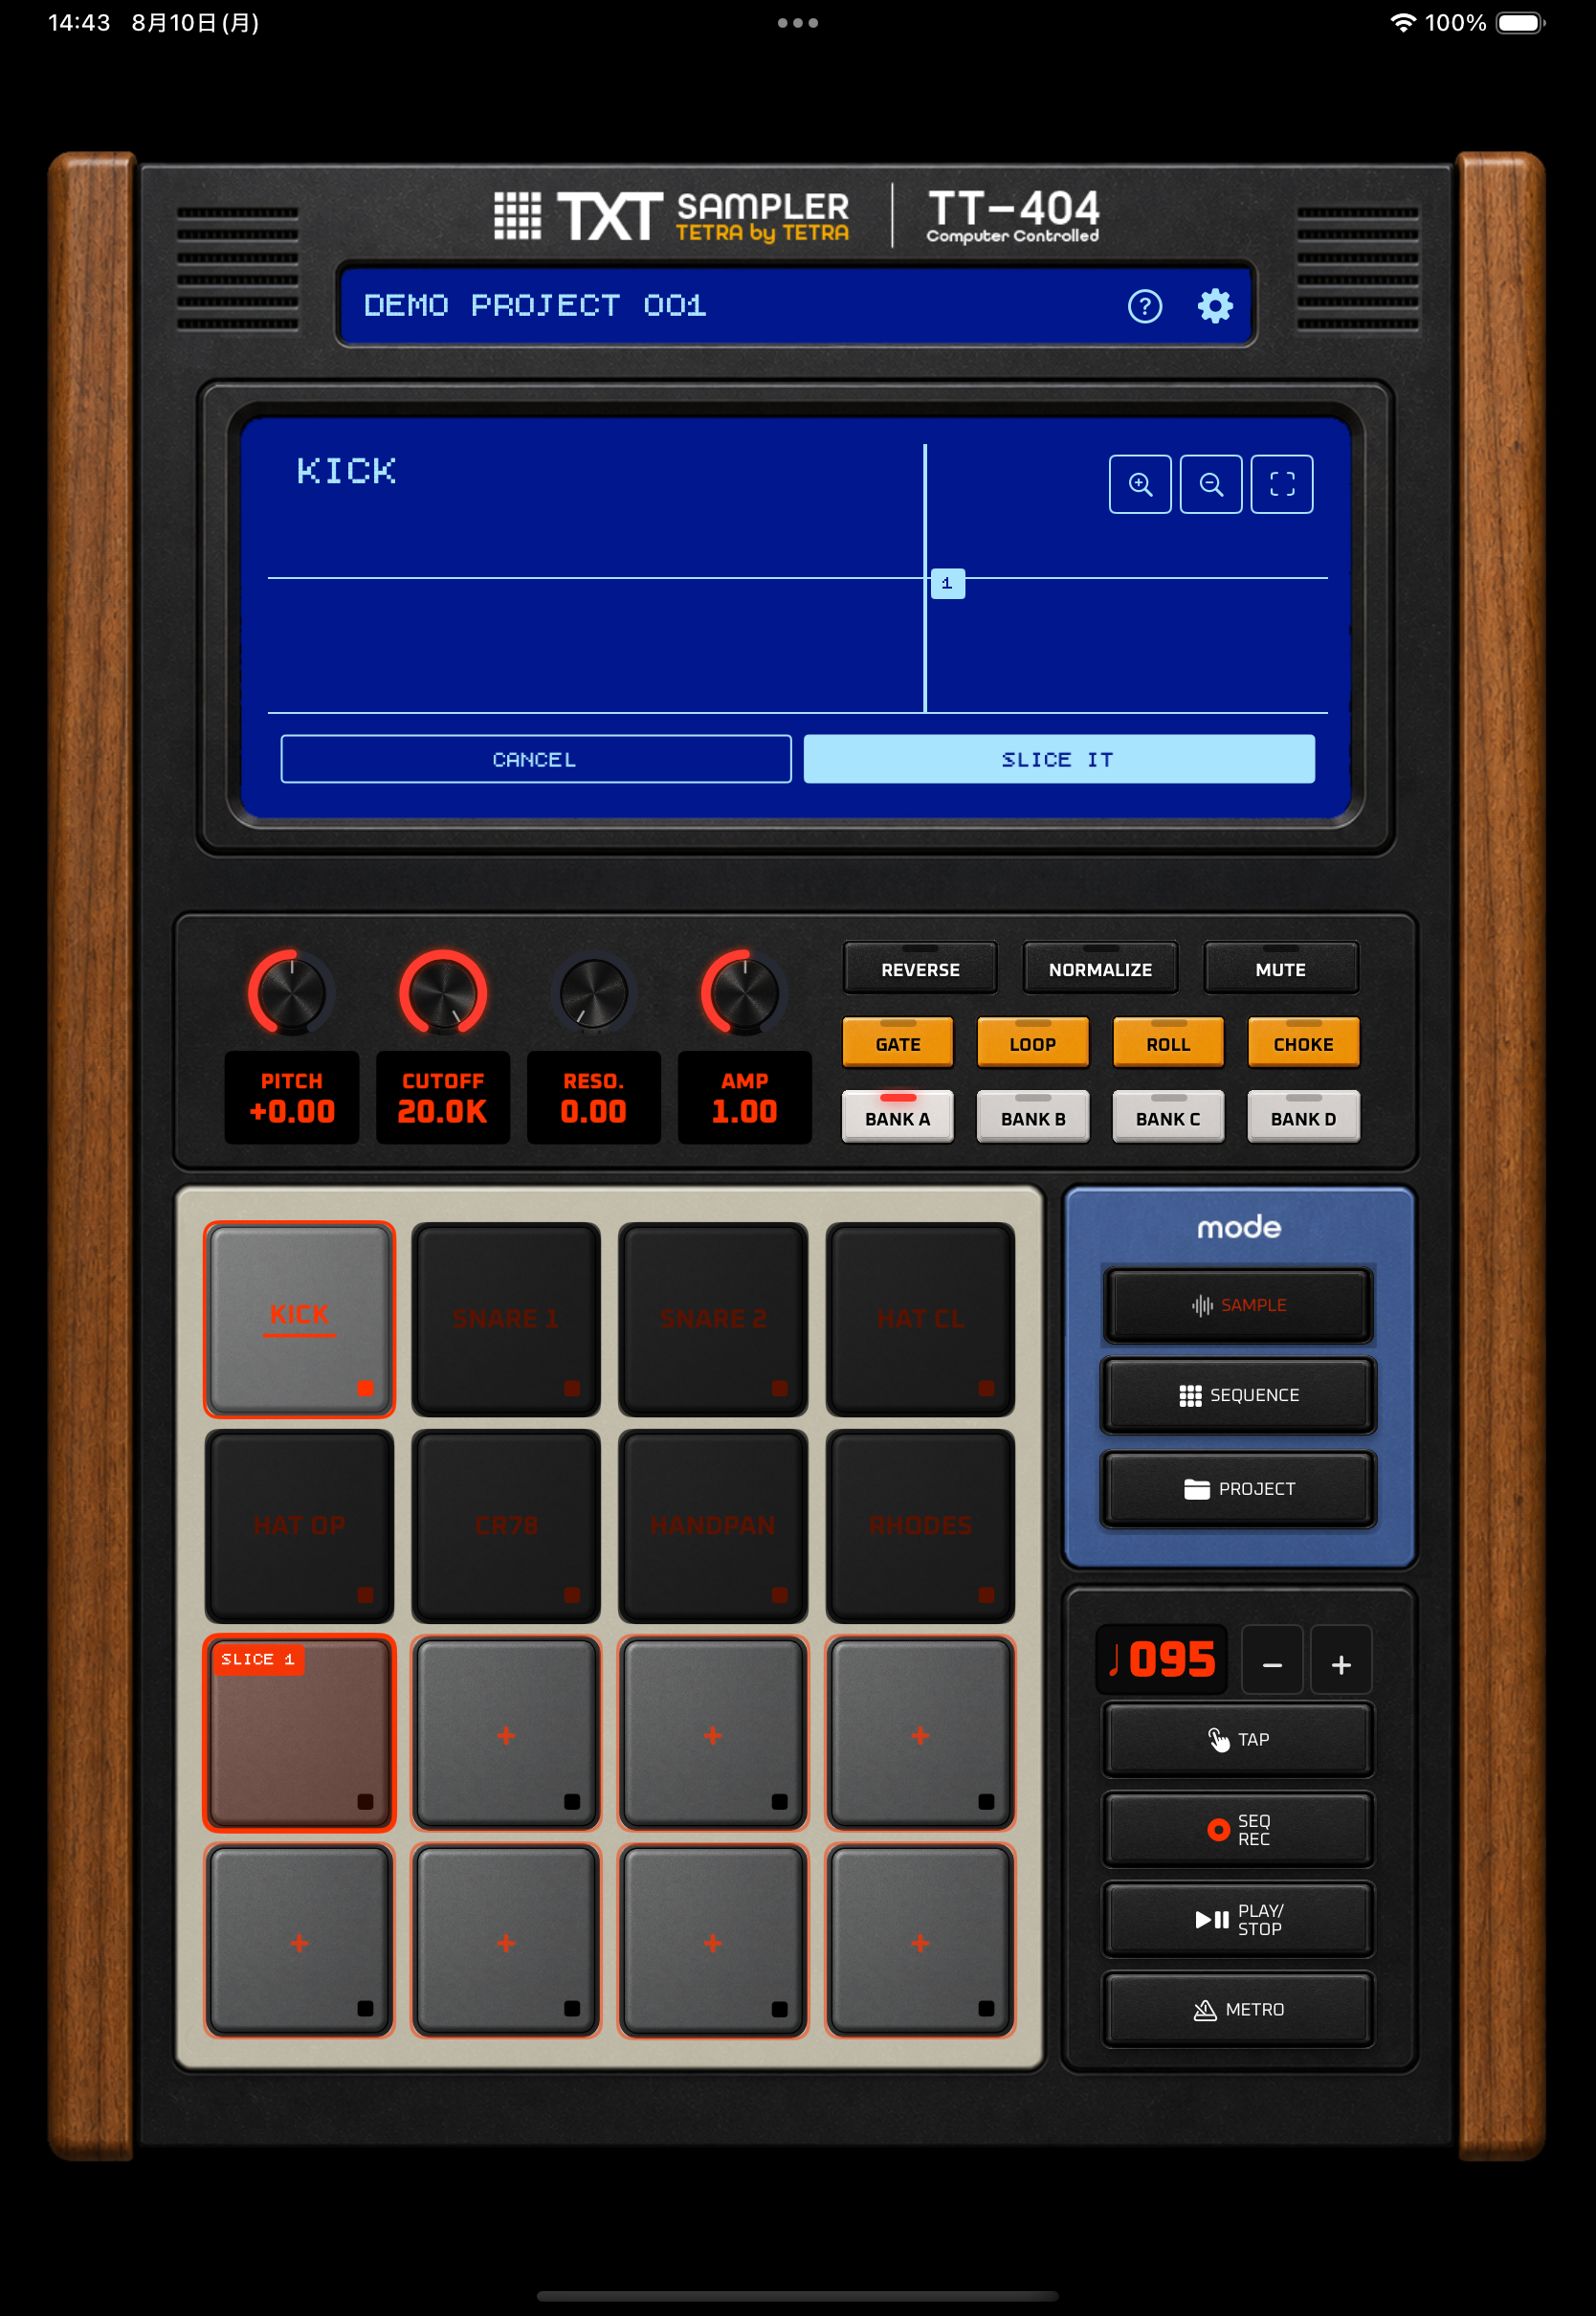
A vertical marker is placed at the playback position and numbered from left to right.
CANCEL discards the temporary slices. SLICE IT saves them to pads.
This is the selected source pad. The source pad itself cannot be a destination.
“+” means available. A red pad with a SLICE number is already assigned.
SLICE lets you place split points while the source sample plays, then save the resulting pieces to other pads. Existing pad contents are not changed until you confirm the save.
Slice numbers are based on the left-to-right position on the waveform, not on the order you tapped pads. Moving a point renumbers the markers.
During temporary preview, tap a destination pad to hear only that slice range. Save with SLICE IT after checking the result.
If the source reaches the end before you add a point, playback automatically restarts from the beginning.
Saved pad contents do not change until you tap SLICE IT. Tap CANCEL to discard the temporary slices and leave all pads unchanged. The source pad is also preserved.
“Overwrite existing samples with SLICE” in Settings > Pad Settings is off by default. When it is off, occupied pads cannot be selected as destinations. When it is on, the app asks you to confirm the destination pads before SLICE IT overwrites them.
After SLICE IT, the app asks whether to keep or clear the source sample. Keeping it leaves the original pad available as source material. Clearing it does not remove the slices already saved to destination pads.
05
SEQUENCE mode
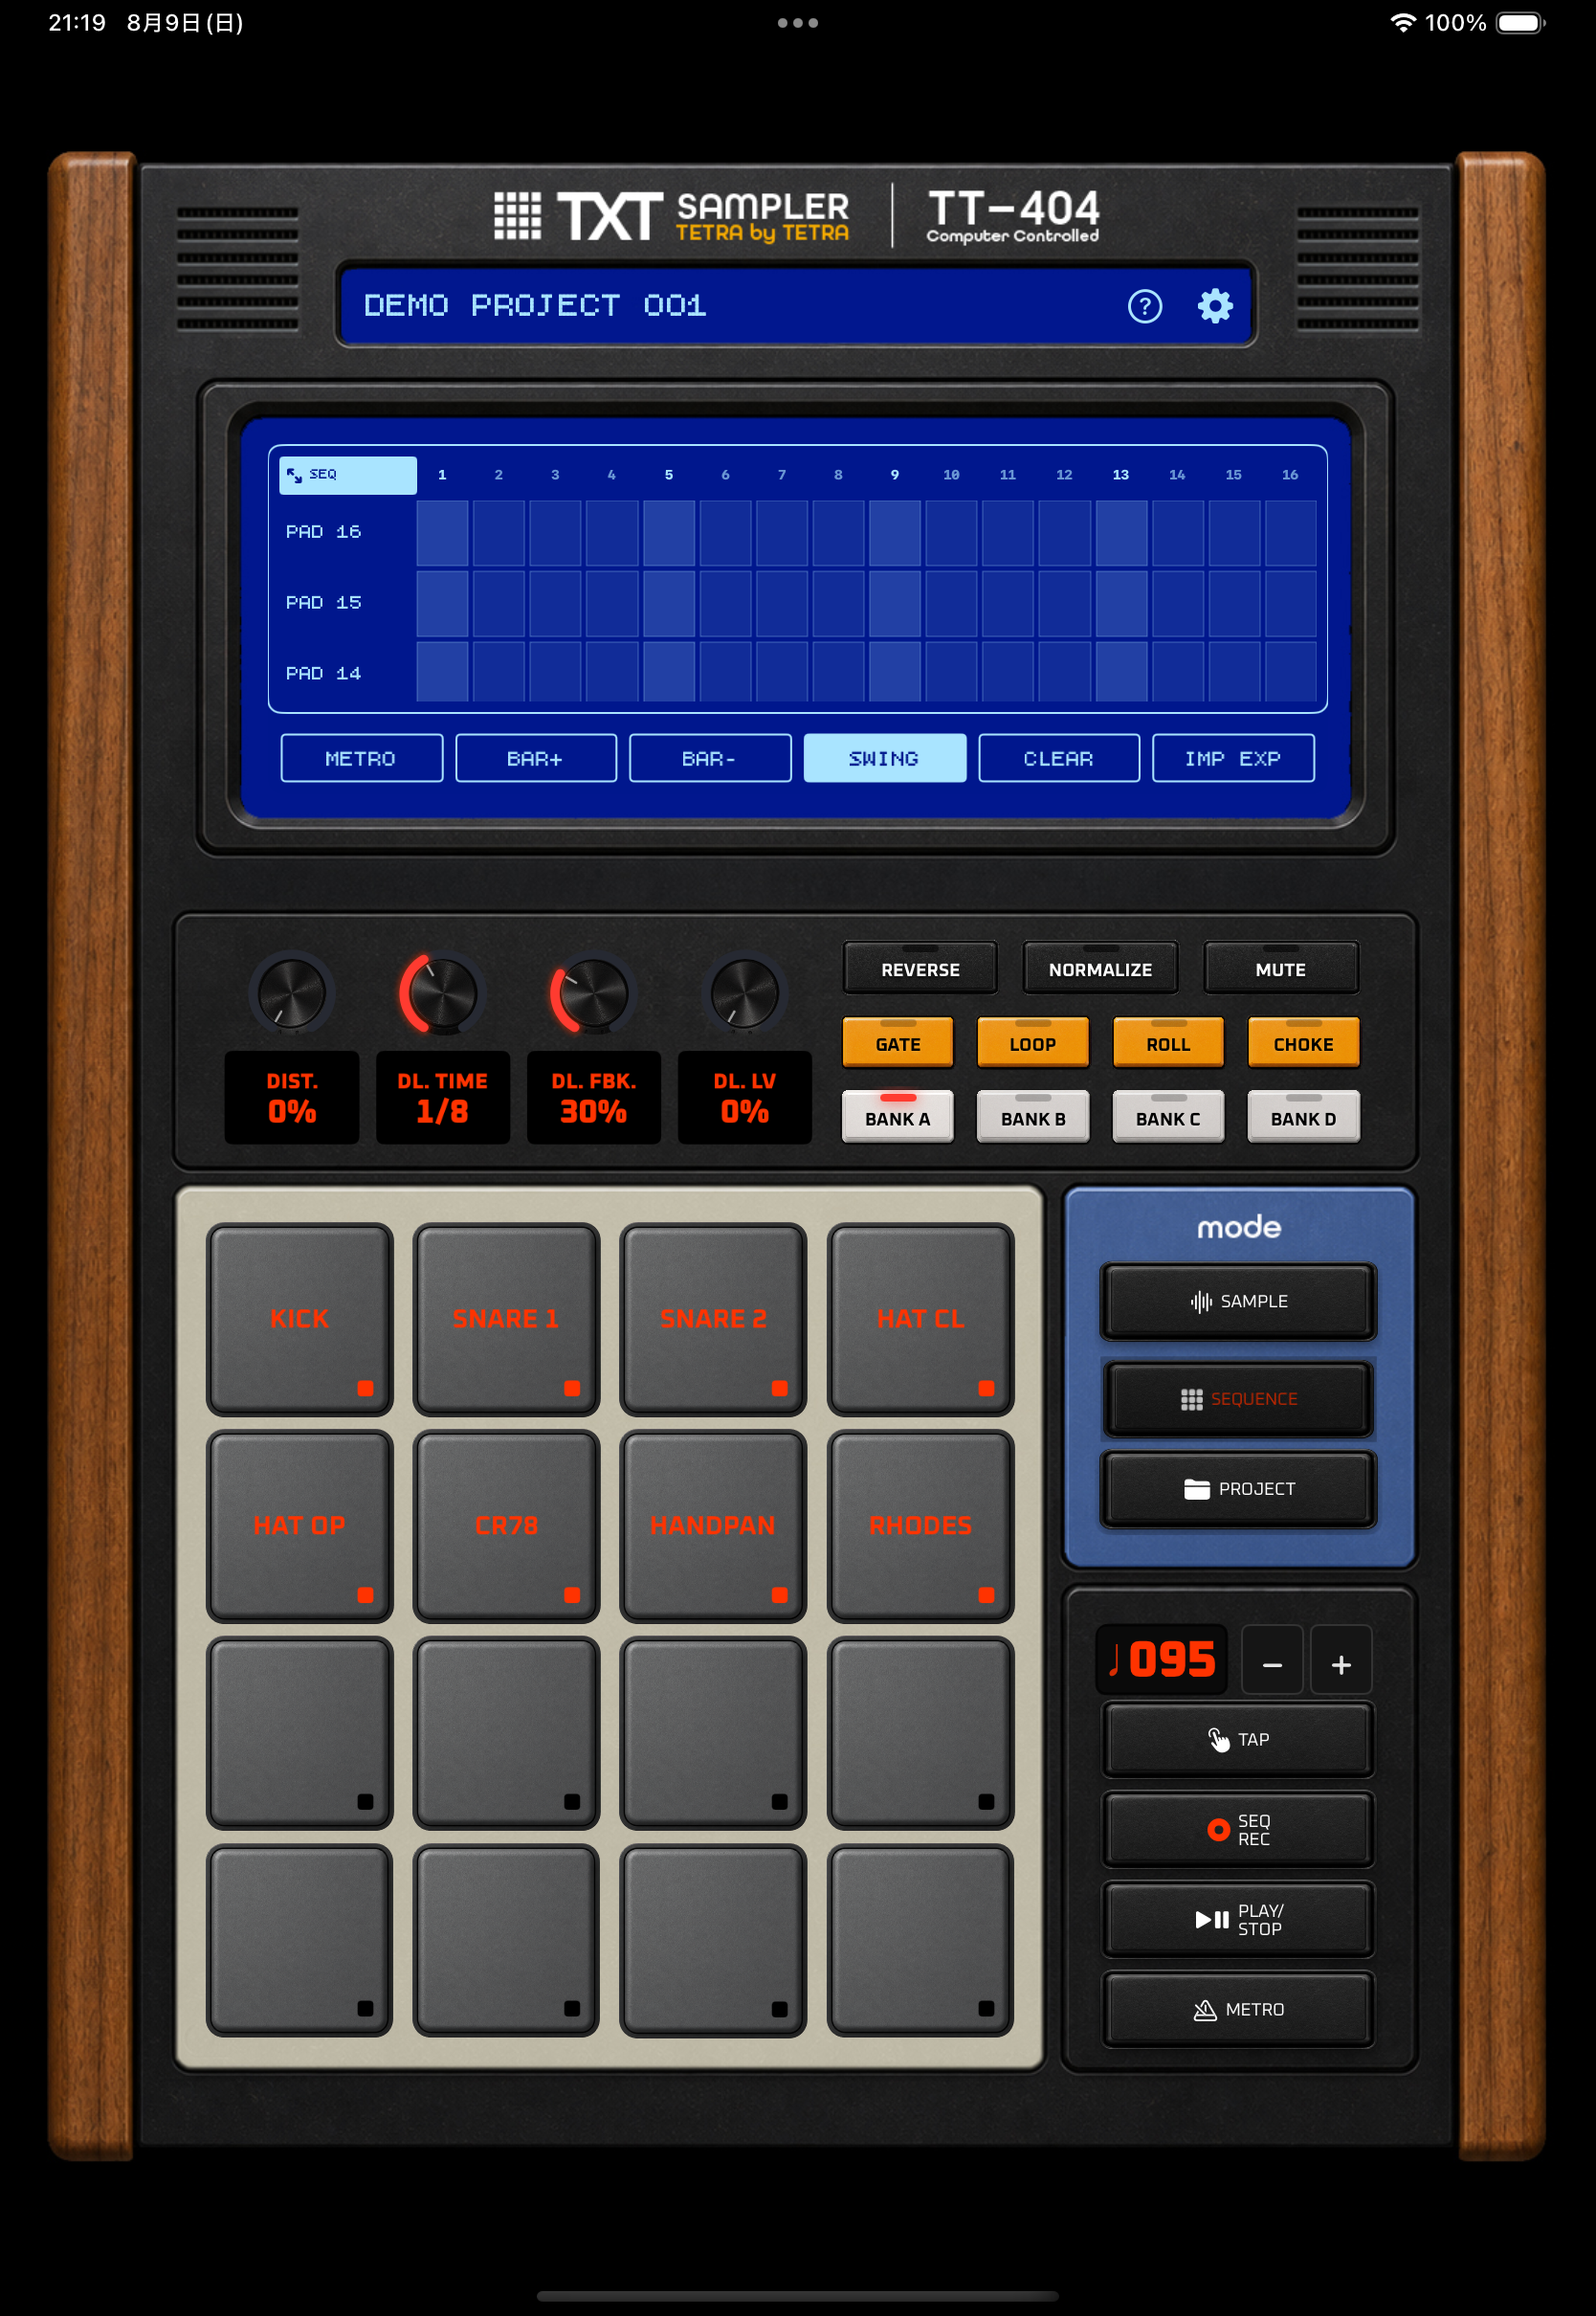
Tap cells to turn 16th-note steps on or off for each pad.
Adjust bar count, Swing, and the selected BANK pattern. The large SEQUENCE window also provides play/stop, bar add/remove, previous/next bar, and Swing controls.
Changing pads or BANK switches to the sequence for the selected BANK.
Control playback and stop.
BANK A-D each keep their own sequence steps and bar count. BPM and Swing are shared across the project.
Turn on SEQ REC to move to SEQUENCE mode, then start playback to record pad performance into the 16th-note grid after a 1-bar count-in. On-screen pad input records at the highest Velocity level.
The SEQUENCE LCD always uses the sequence view. One dynamic <PREV/NEXT> button moves the visible bar. The SEQ button in the sequence's upper-left PAD header opens a large SEQUENCE window for editing the same note on/off states. On iPad, the large SEQUENCE view shows all 16 pads without vertical scrolling.
The current SEQ REC records to 16th-note steps. Quantize-off timing offsets, Velocity editing in the sequence, and note-length editing are not supported yet.
Press SEQ in the upper-left of the SEQUENCE mode grid to open the large SEQUENCE popup window. It edits the same selected BANK as the main screen, so any steps you turn on or off here are reflected in the normal SEQUENCE view.
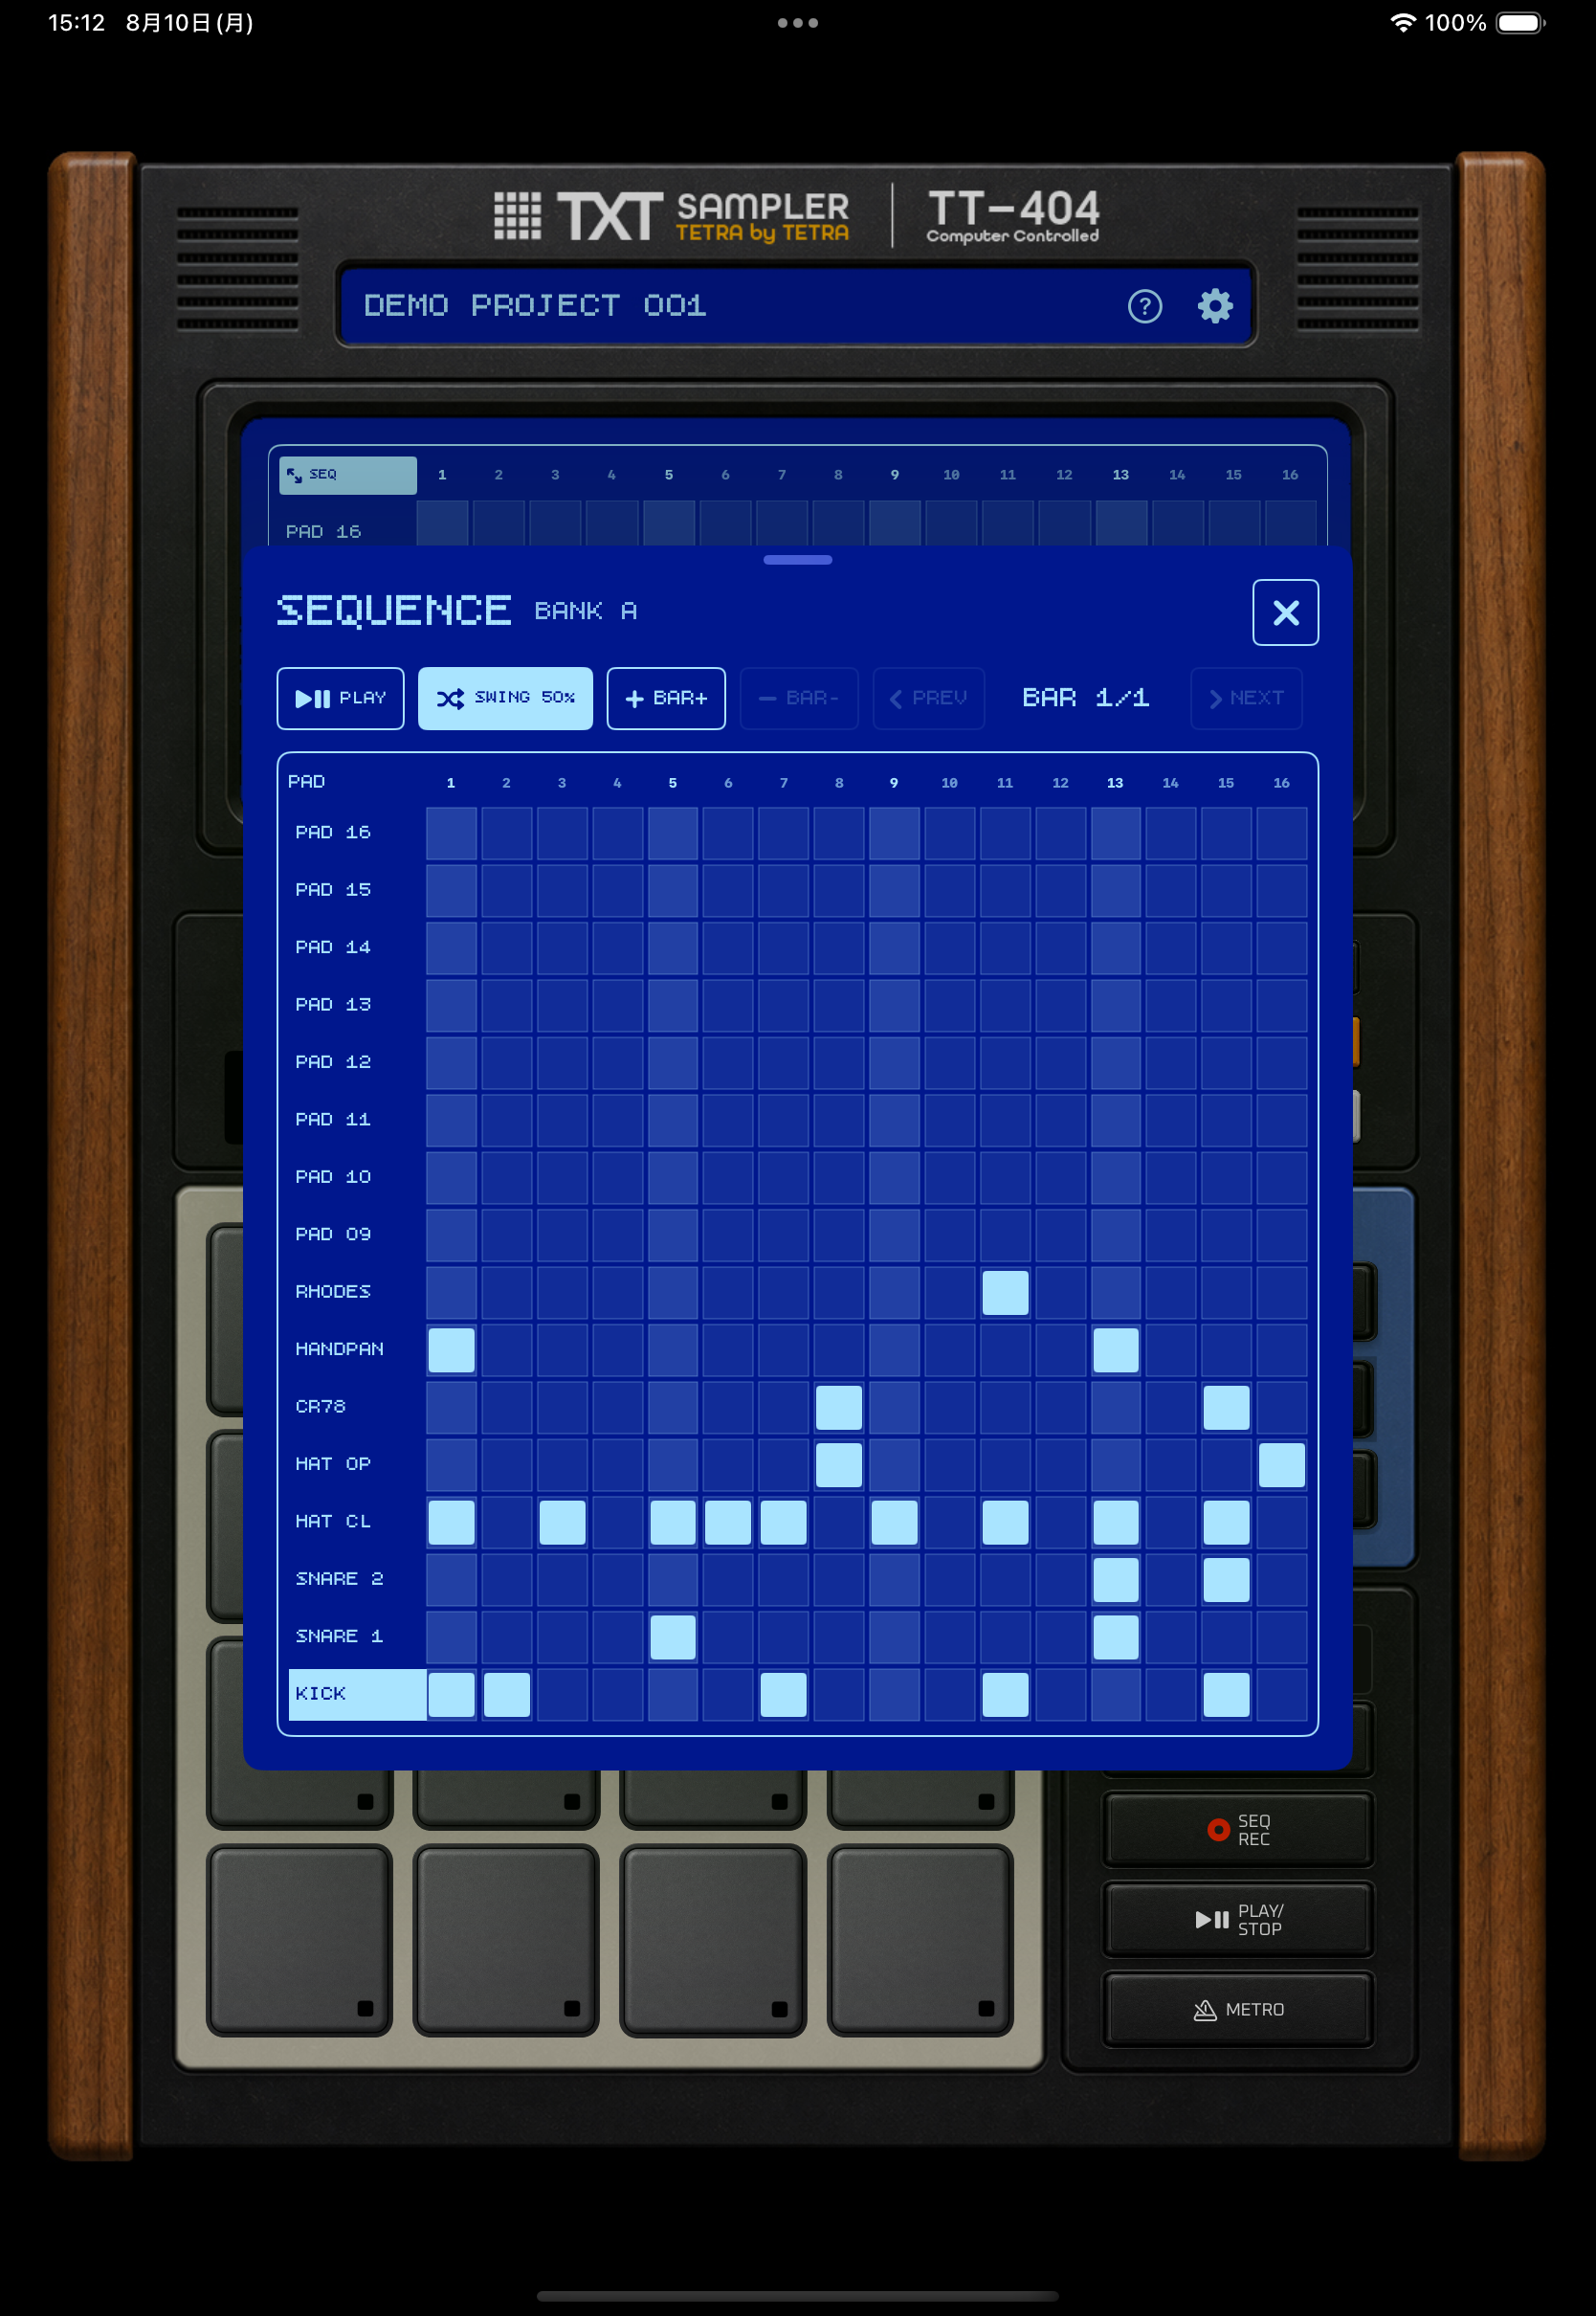
Shows the BANK being edited. Switching BANK changes to that BANK's own sequence steps and bar count.
Control play/stop, Swing, bar add/remove, and previous/next bar from inside the popup. The free plan is limited to 2 Bars.
Rows are pads and columns are 16th-note steps. Tap lit cells to turn each pad's playback positions on or off.
Closing the popup keeps your edits. Return to the normal screen to keep checking the same BANK sequence.
Drag a knob up or down to adjust it. The value snaps near important positions such as center, zero, or a representative time for that control. Tap the numeric LCD below a supported knob to enter an exact value with the keyboard.
Changes the overall speed.
Delays even-feel offbeat steps for a swung rhythm.
BAR+ adds a bar, BAR- removes the last bar, and the dynamic <PREV/NEXT> button moves between bars. The free plan is limited to 2 Bars. The Premium plan supports up to 8 Bars.
In SEQUENCE mode, the four knobs work as DIST., DL. TIME, DL. FBK., and DL. LV.
CLEAR clears the current BANK sequence.
Tap IMP EXP to choose IMPORT JSON or EXPORT JSON. You can import or export the sequence BPM, Swing, step data, and SAMPLE parameters as JSON.
IMPORT JSON overwrites the sequence for the currently selected BANK and SAMPLE parameters. Audio files and other BANK sequences are not included.
06
PROJECT mode
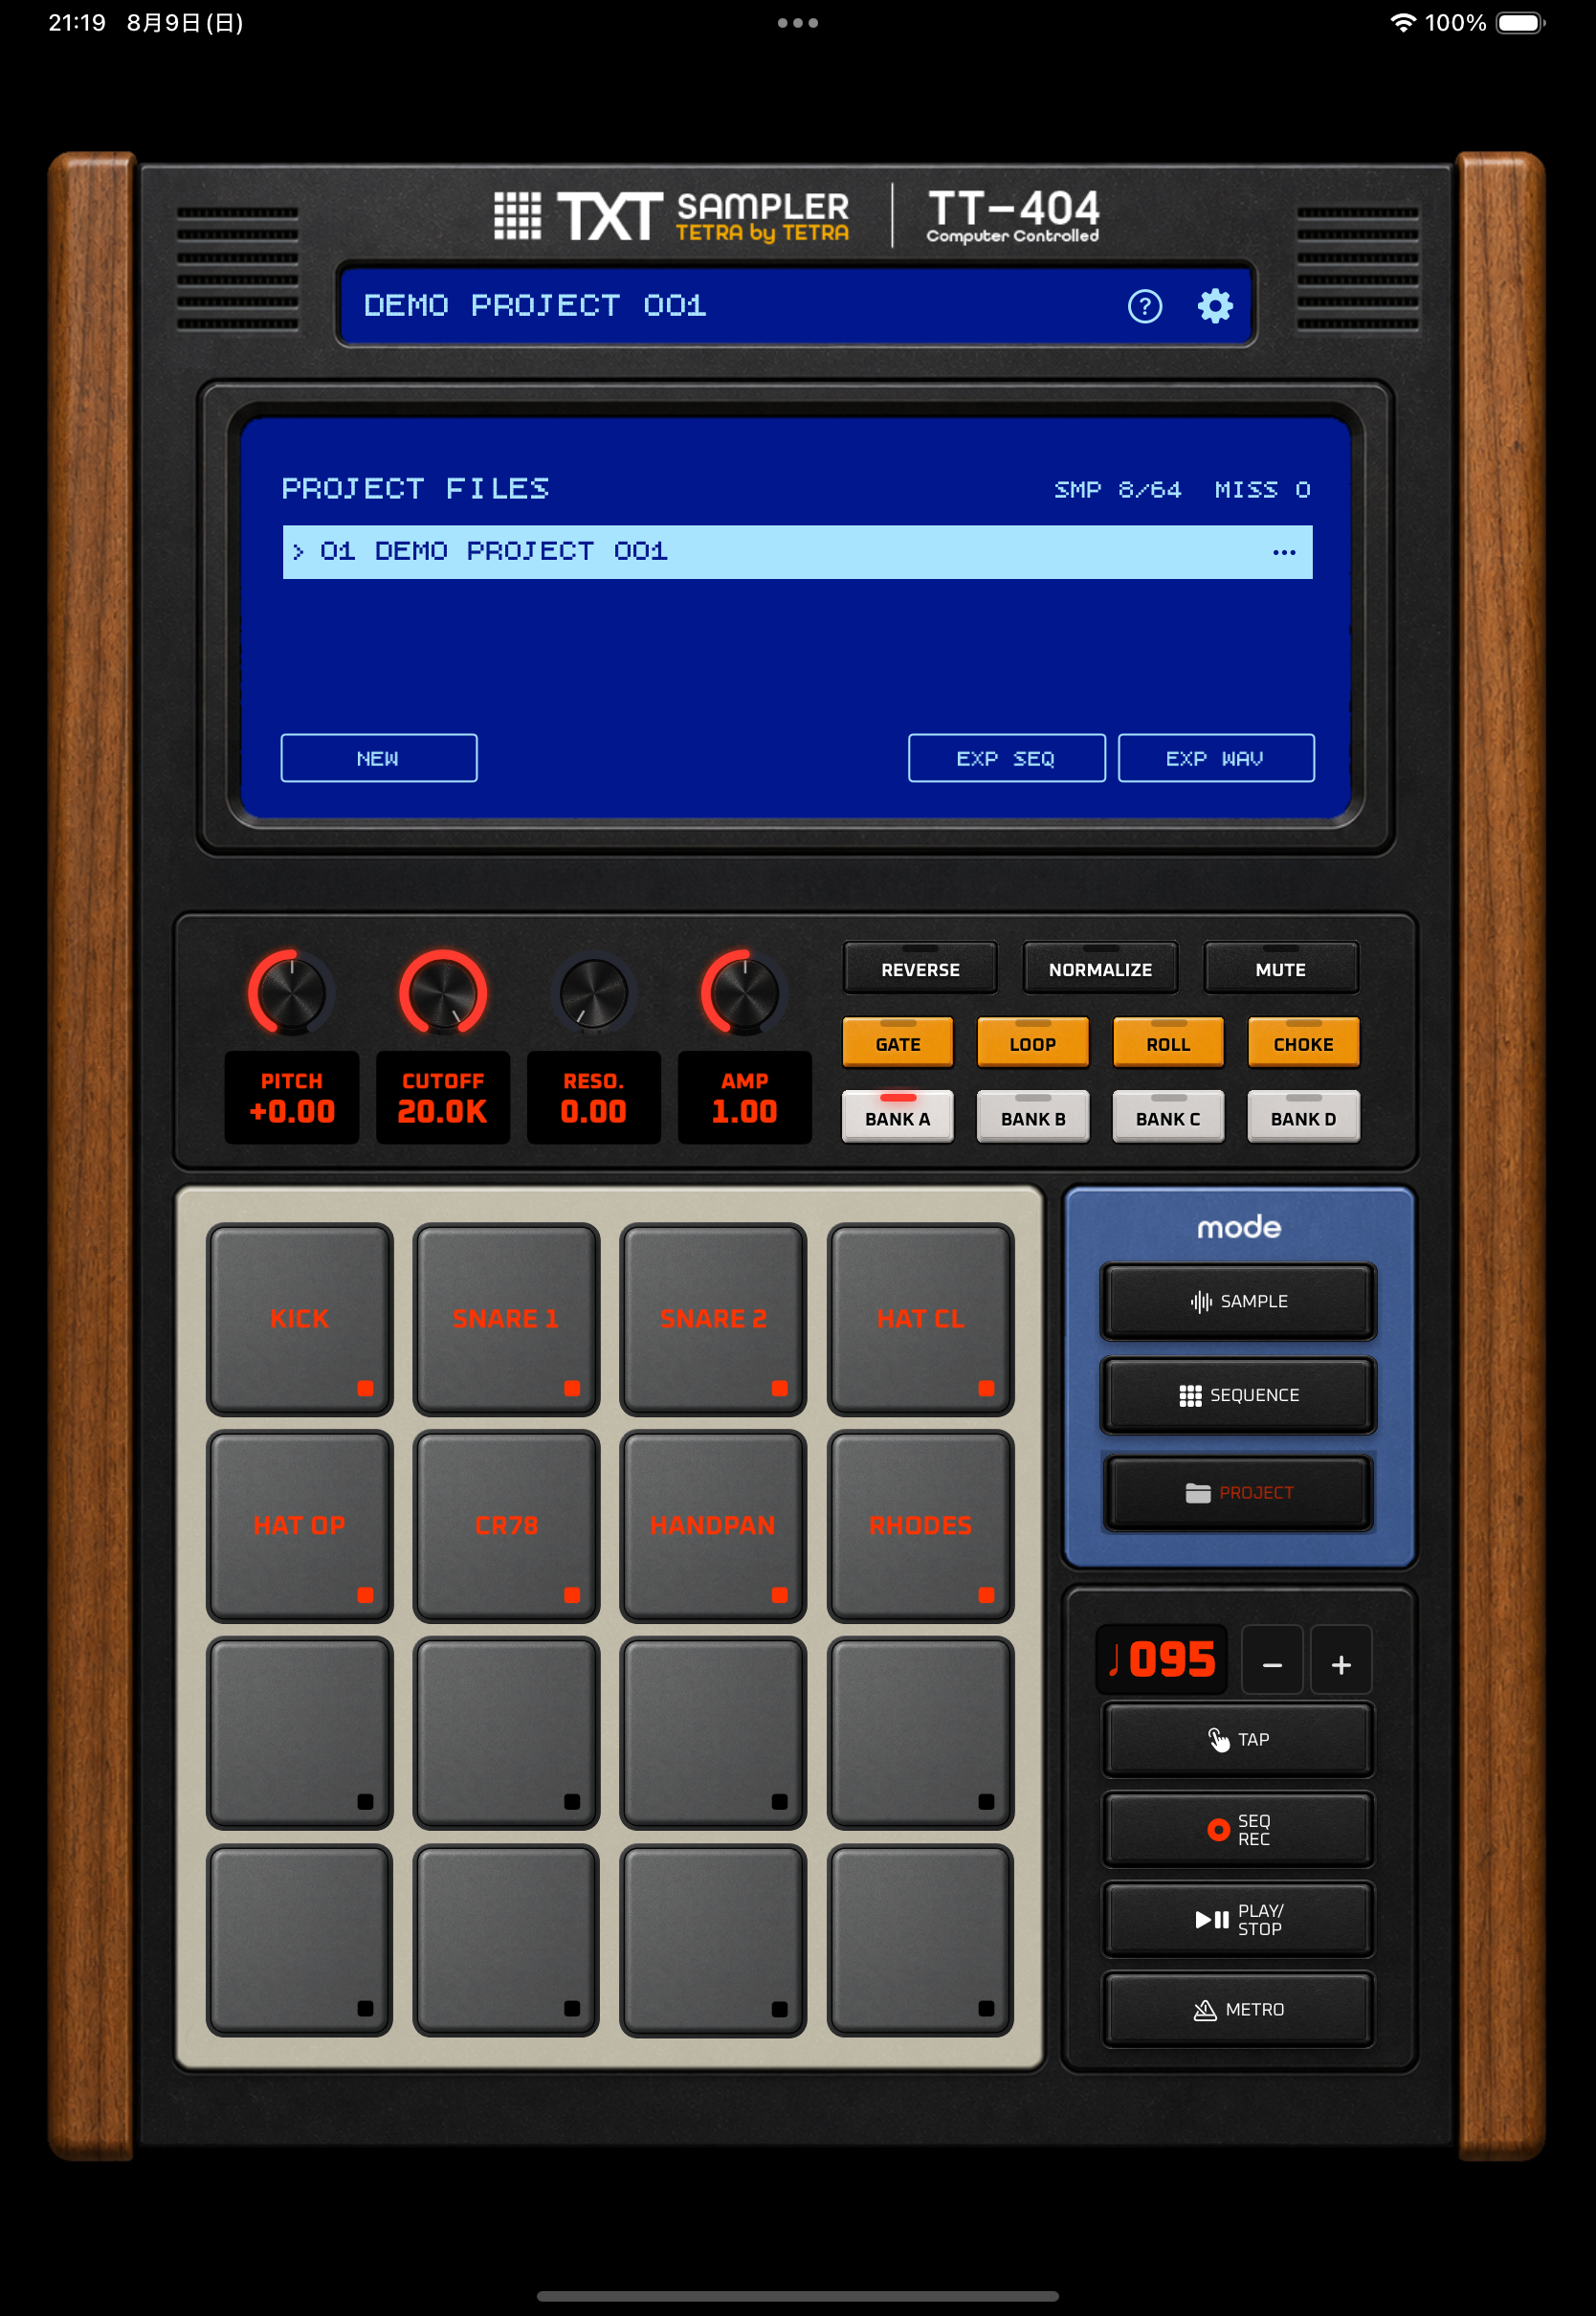
Shows sample count, missing files, and data size.
Use NEW, EXP SEQ, and EXP WAV. Open COPY and DELETE from the project row’s “…” menu.
Pressing a pad in PROJECT moves to SAMPLE and plays that sound.
Play or stop the saved pattern.
A project stores samples, pad settings, sequences, BPM, and related work data.
Create an empty project.
Duplicate the current project. Use it as a backup before editing.
Delete the selected project.
Export the current sequence as a WAV file.
Check the target project carefully before deleting from the list menu or swipe action.
When effects are included, a 2-second tail is added to preserve reverb or delay decay. Without effects, the WAV is exported at the exact sequence length.
WAV export is a Premium feature.
07
Settings
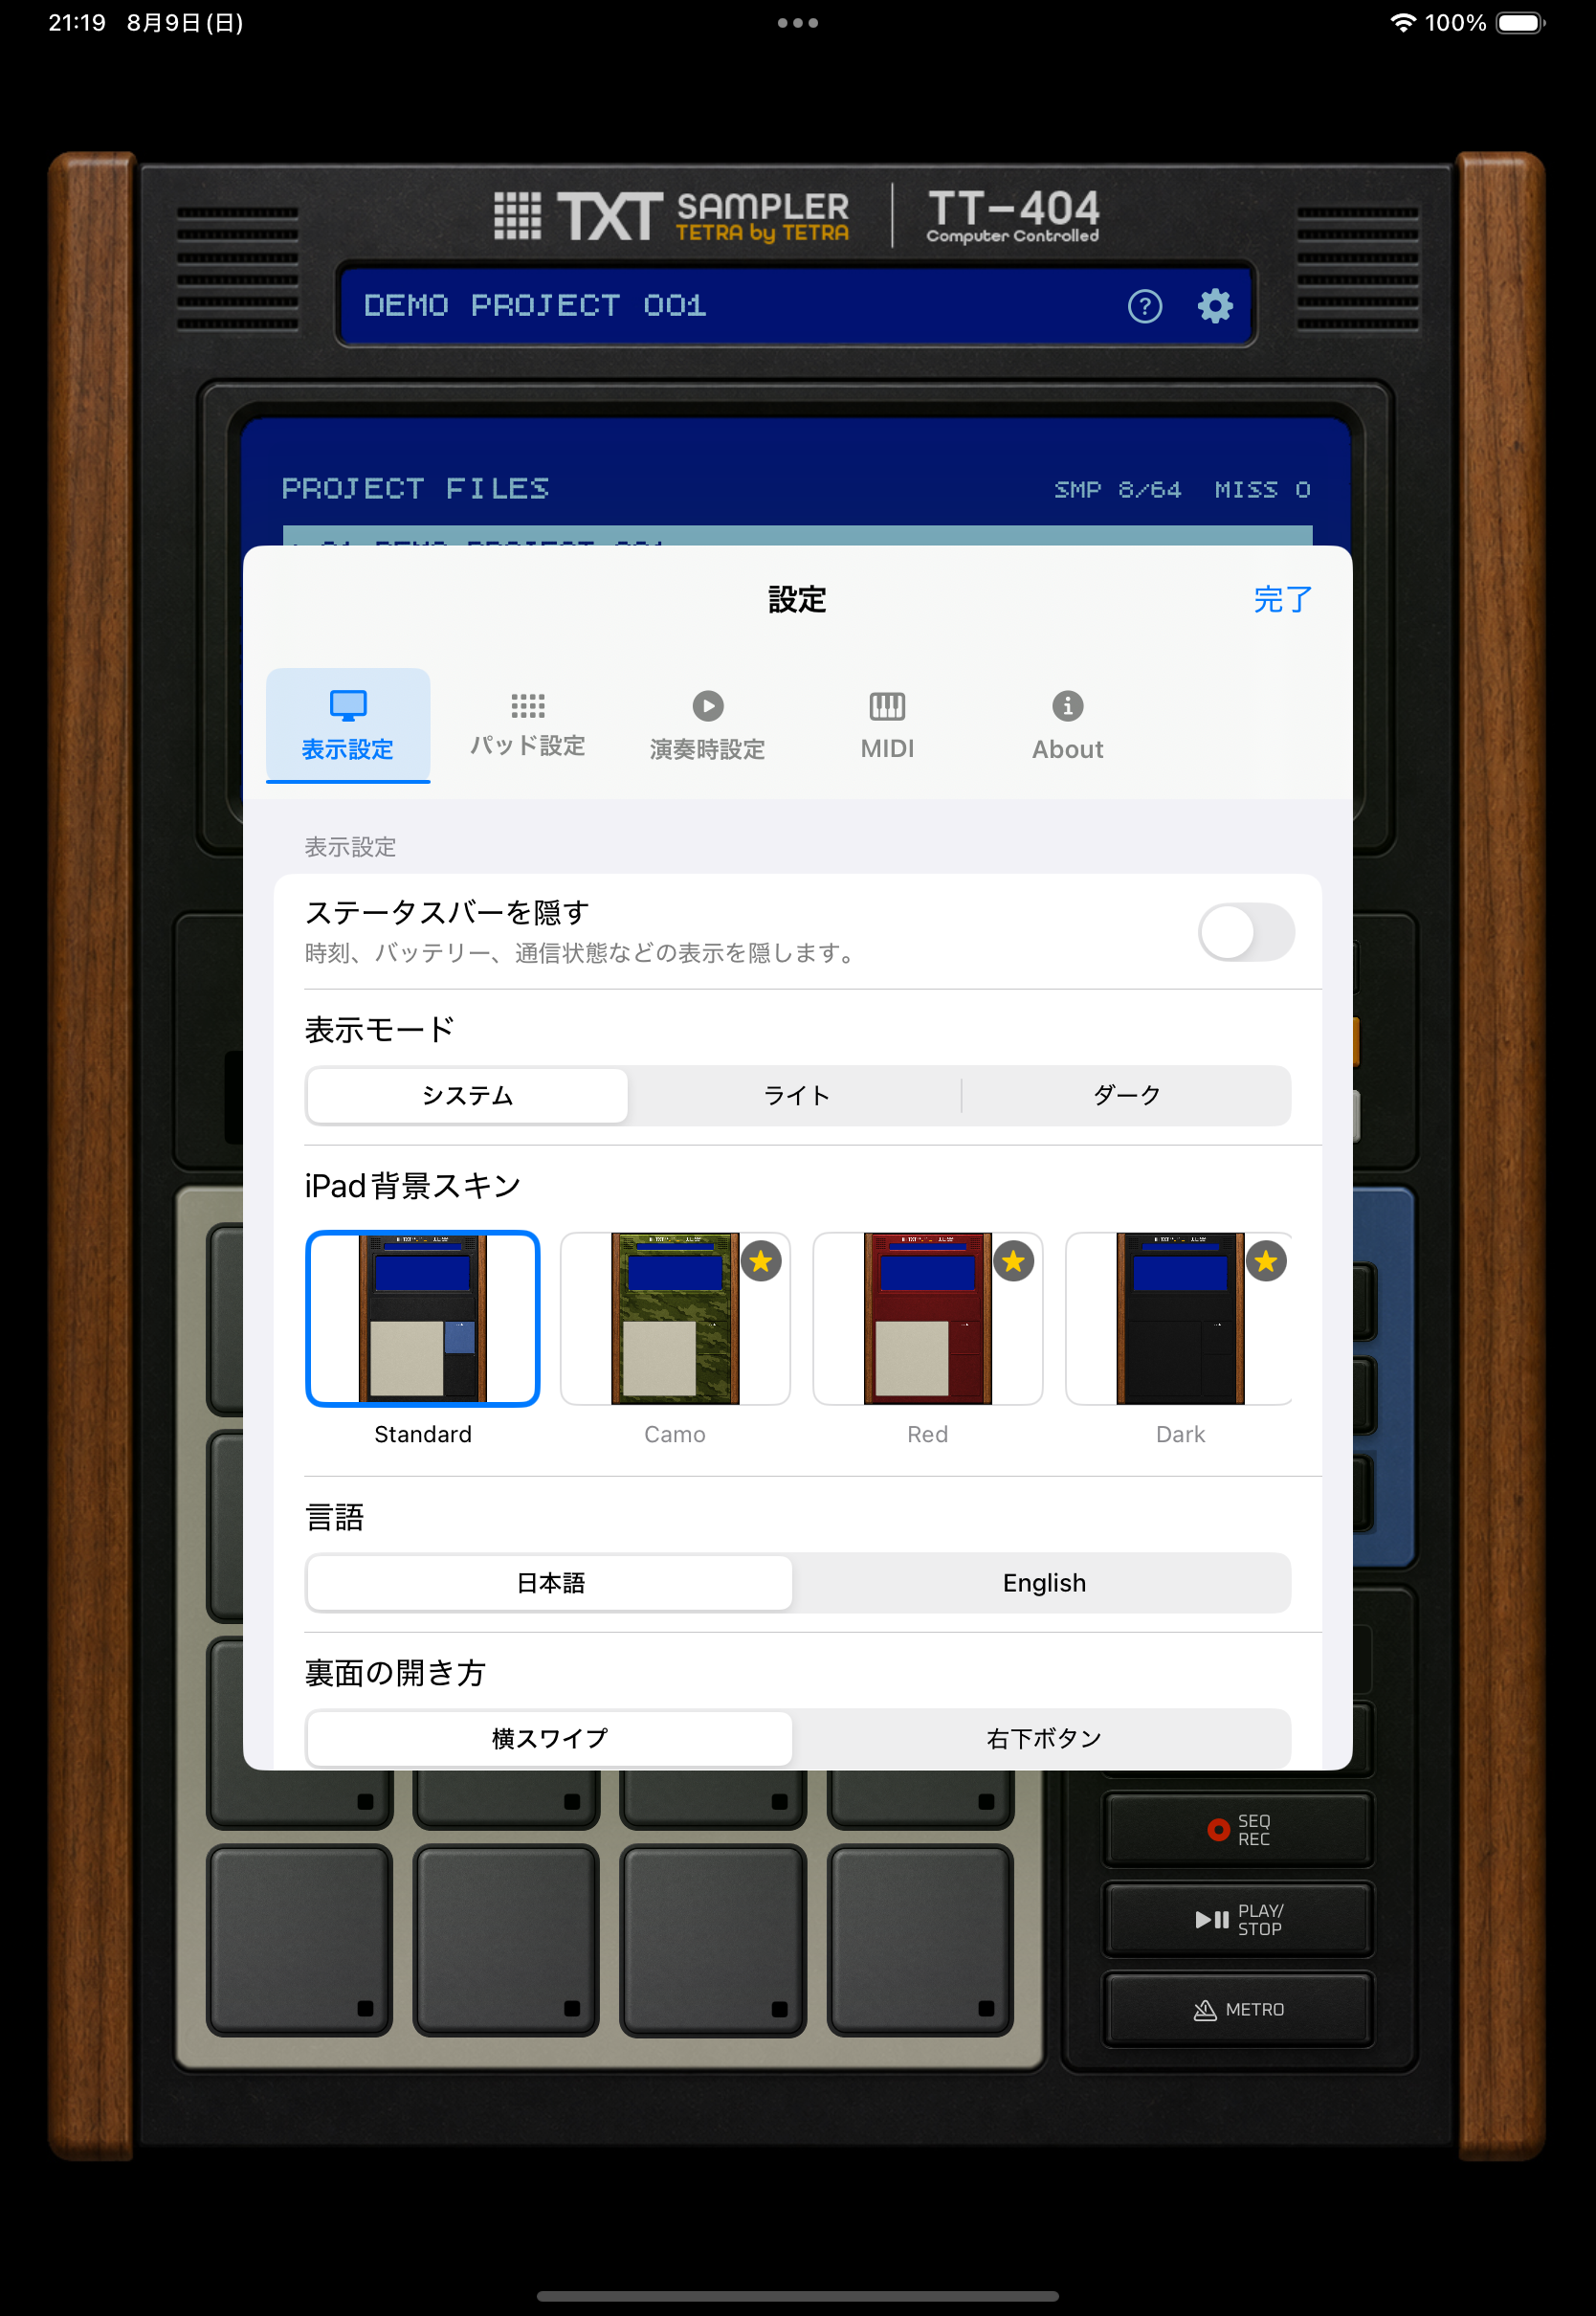
Switch between Display Settings, Pad Settings, Performance Settings, MIDI, and About.
Choose Light, Dark, or System appearance.
Choose the device background skin. Additional skins are a Premium feature.
Performance Mode prioritizes pad triggering, suppresses pad-tap haptics, normal playhead updates, pad waveform thumbnails, recording updates, and editing-state updates, and shows only the static LIVE MODE label on the LCD on both iPhone and iPad while performing. Performance Mode cannot be turned on while recording, SLICE, loading, trimming, or export processing is in progress. Audio output always uses the low-latency configuration.
Turn on Background Playback to keep playback running while the screen is locked, the Home Screen is visible, or another app is visible. Playback stops if you explicitly quit the app from the App Switcher. It is off by default.
Bluetooth headphones and wireless audio devices can add hardware latency. Use the built-in speaker or wired output when performing.
08
MIDI Settings
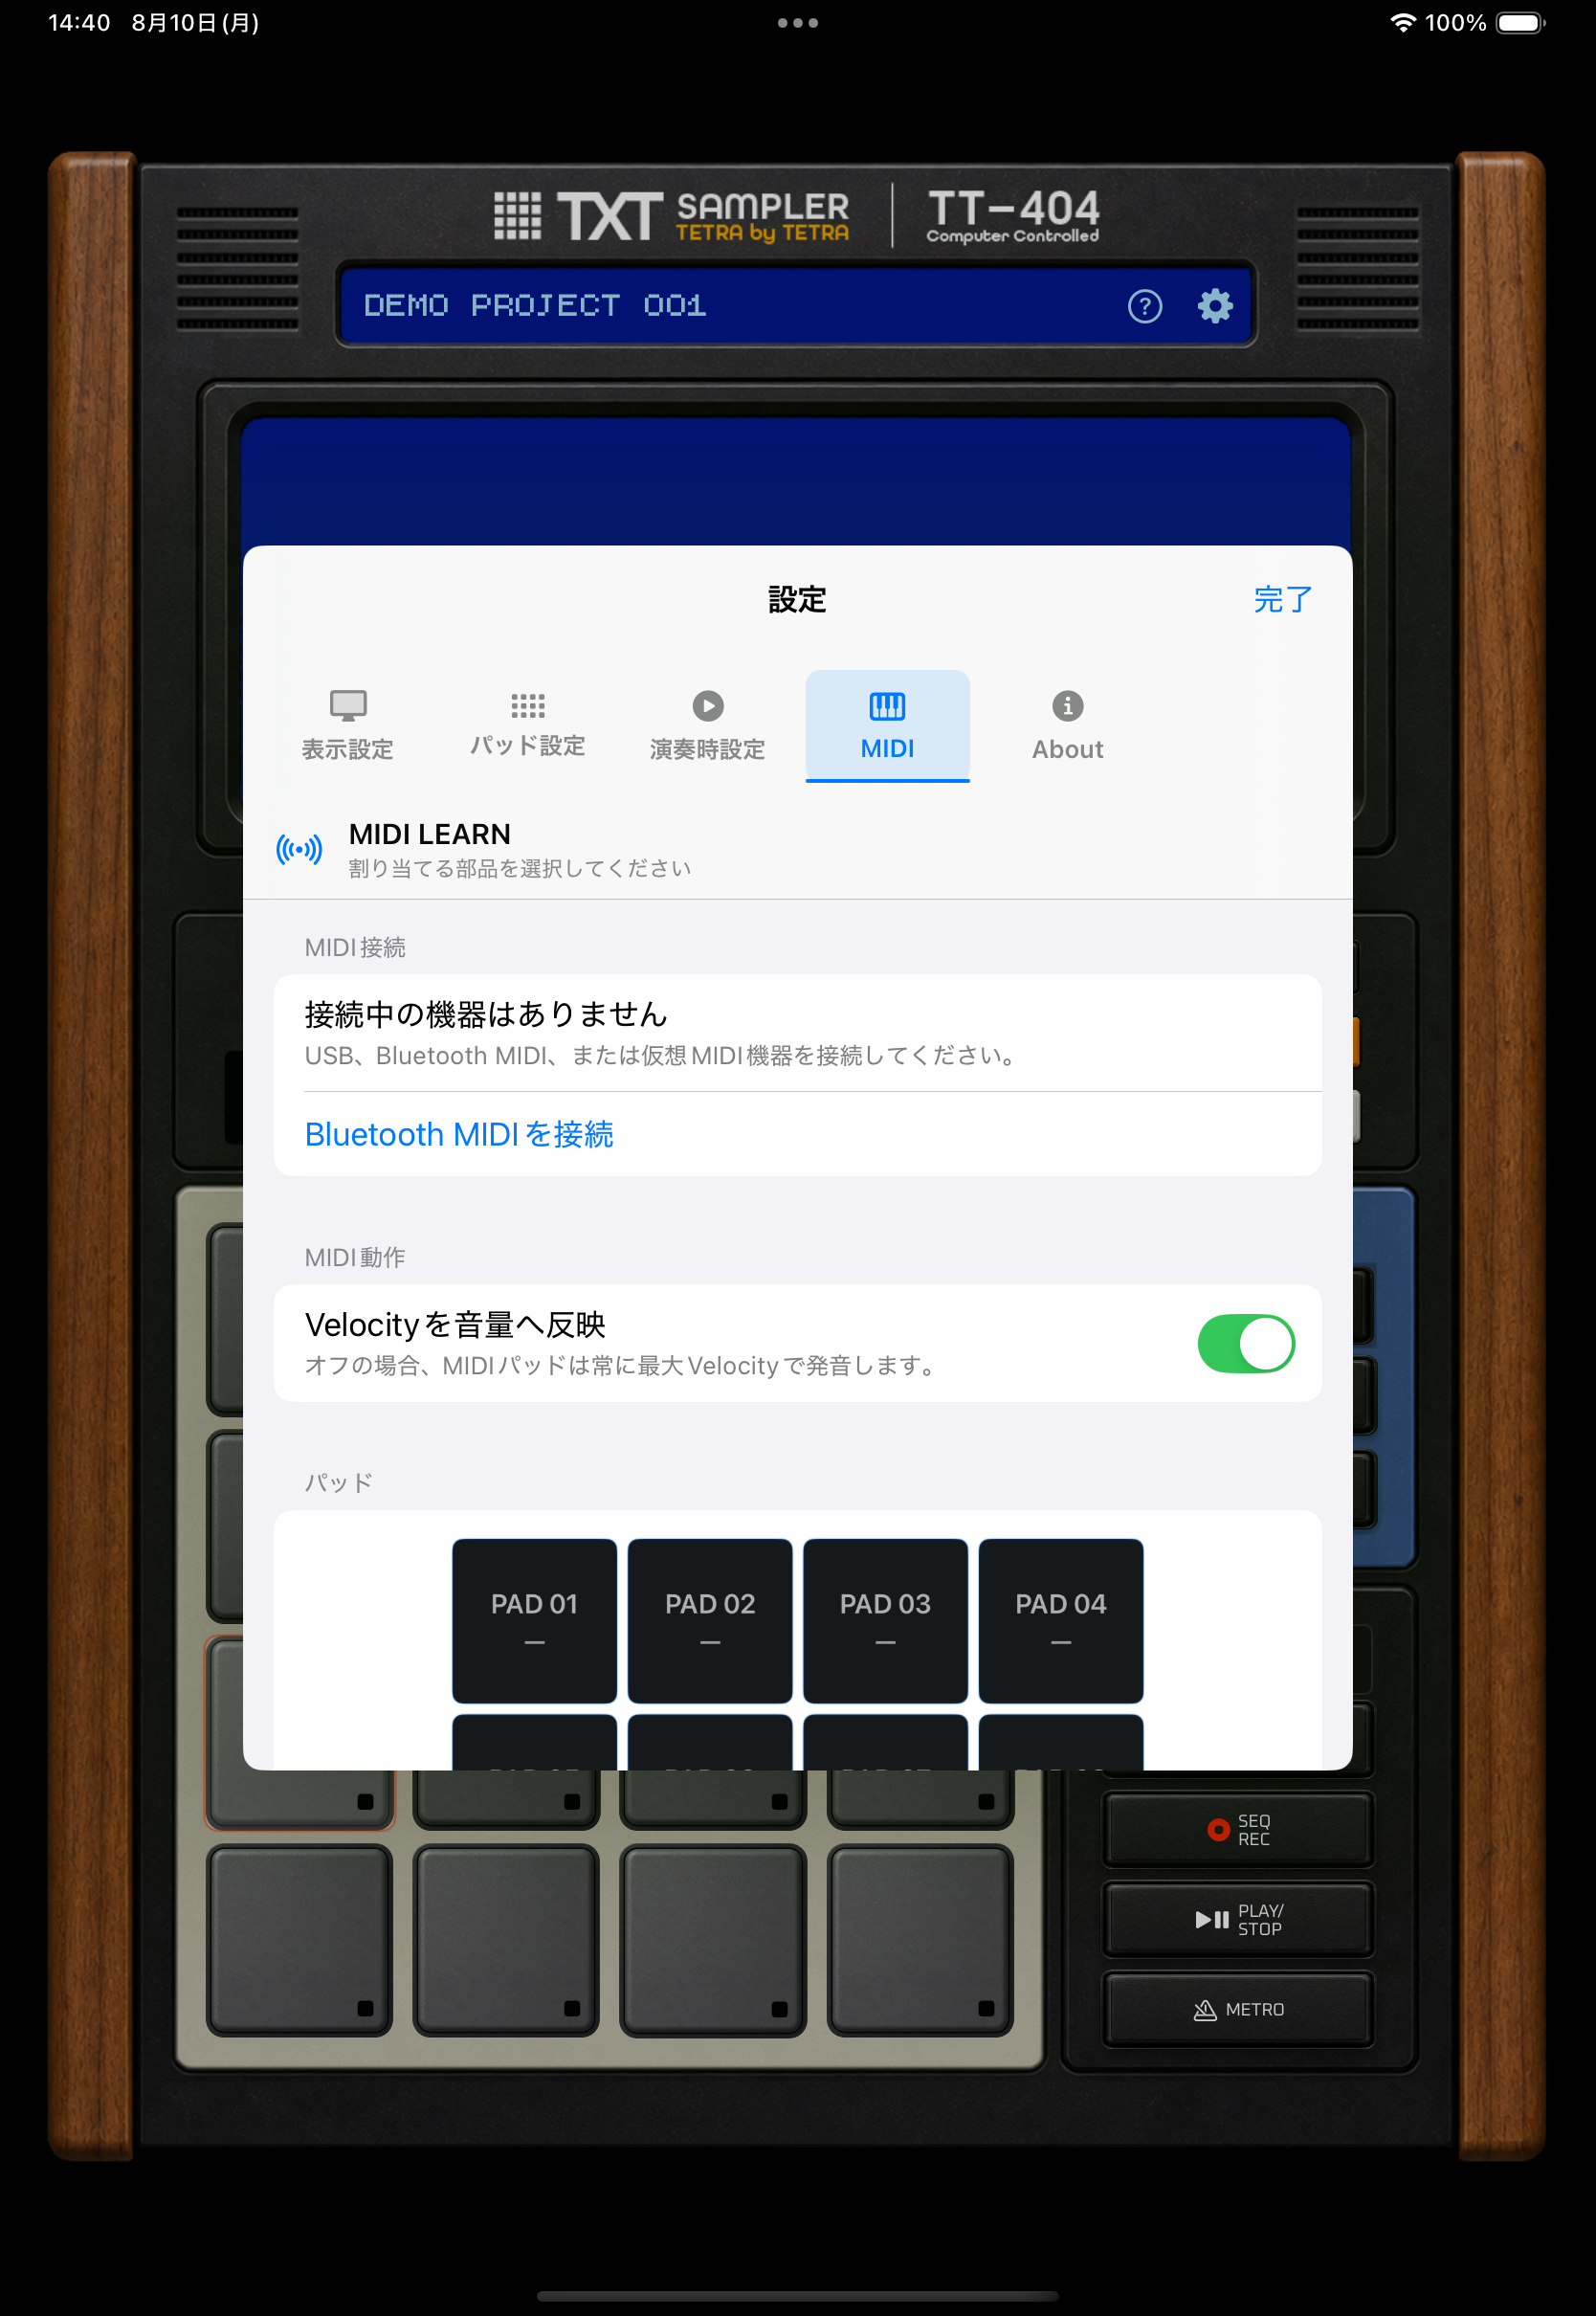
Choose MIDI at the top of Settings to open MIDI Learn.
Check USB, Bluetooth MIDI, and virtual MIDI source status.
Choose whether external pad Velocity controls playback volume.
Select a 4×4 pad, knob, panel control, or performance/edit control to learn.
Use an external MIDI controller to play pads, move knobs, and switch modes or banks. MIDI connection, Learn, and incoming control require Premium.
When “Use Velocity for volume” is on, pad Velocity 1–127 maps continuously to volume. When off, pads always play at maximum velocity. Knob CC values 0–127 map to each on-screen parameter range. MIDI 1.0 Running Status is supported when Note or CC data spans multiple CoreMIDI packets.
Assignments are shared by all projects. Non-pad assignments can be removed from their rows. When you select an assigned pad, “Unassign” appears to the left of “Cancel” in the header. It removes that pad assignment and ends Learn. Removing all clears MIDI settings only; projects, samples, and purchase state are not changed. Saved assignments remain if Premium entitlement cannot be confirmed, but incoming MIDI control is disabled.
Master volume is not available in the current UI and cannot be assigned with MIDI Learn. BPM−/+, SAMPLE REC, ADSR, sequence QTZ/SWING/BAR/STEP, CLEAR, deletion, reset, purchases, file selection, project management, and confirmation dialogs also cannot be assigned. MIDI Clock, MIDI output, Program Change, Pitch Bend, NRPN, and relative encoders are not supported.
Confirm that the source name appears under MIDI Connections, operating the device during Learn opens the “MIDI signal received” dialog, the channel and number shown there match the assignment, and Premium is active. After disconnecting hardware, wait for reconnection or reopen the Bluetooth MIDI screen.
Compatibility and continued operation with every device are not guaranteed. The developer does not provide support for device specifications, configuration methods, connection methods, or individual compatibility. If you believe an issue is caused by the App, report it through the support form with the device name, connection method, iOS version, and reproduction steps.
09
Plan comparison
| Feature | Free plan | Premium plan |
|---|---|---|
| Pads | Upper 8 pads in Bank A | All 64 pads across 4 banks |
| Projects | 1 project | No project count limit |
| Sequence | 2 Bars | Up to 8 Bars |
| File import | Up to 10 seconds | Up to 60 seconds |
| Microphone recording | Up to 10 seconds | Up to 30 seconds |
| Pad appearance | Not editable | Individual or batch color changes and long-press drag swapping |
| iPad background skins | Standard only | Additional skins selectable |
| WAV export | Not available | Available |
| MIDI control | Not available | MIDI Learn and external control |
The Premium plan is a one-time purchase. Check the App Store purchase screen for the current price. After reinstalling or changing devices, use Settings > About > Restore Purchases.
Existing projects and samples are kept. Restoring purchases enables Premium features again.
10
FAQ
Select the destination pad first, then tap LOAD SAMPLE. Check that the file length is within the plan limit.
Allow microphone access for TXT sampler in iOS Settings. Then choose the destination pad and tap REC. If the pad already has a sound, choose “Record” in the confirmation to start recording.
Select the target pad and load the audio again from LOAD SAMPLE.
Connect to the network and run Settings > About > Restore Purchases. Make sure you are using the same Apple Account used for purchase.
Turn on “Keep screen awake” in Settings > Performance Settings. To keep playback running while the screen is locked, also turn on “Background Playback.”
Use FACTORY RESET on the rear panel. This deletes all projects, samples, sequences, and app settings, then recreates DEMO PROJECT 001. This action cannot be undone.
11
Terms and privacy
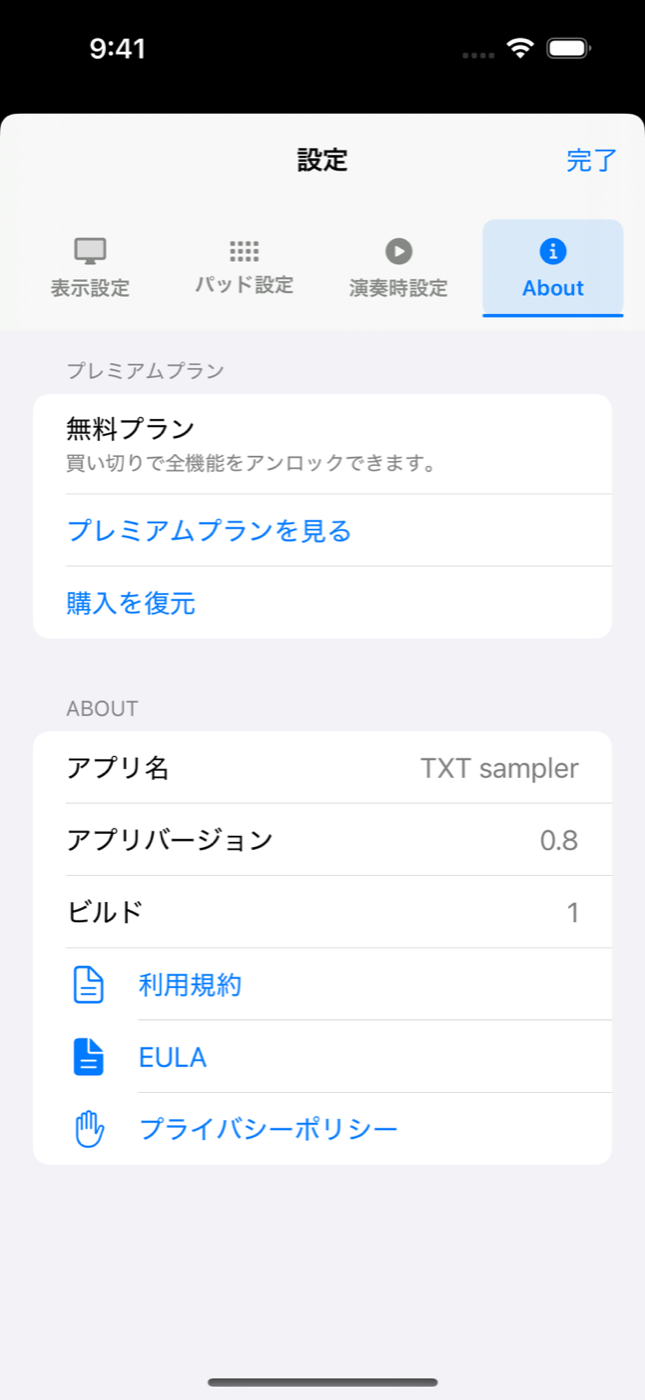
Shows purchase information and Restore Purchases.
Opens Terms of Use, EULA, and Privacy Policy.
The terms define app usage conditions, prohibited actions, disclaimers, and Premium plan information.
The Terms also cover external MIDI compatibility, connections, latency, dropped signals, unintended input, support scope, and discontinuation of the App's distribution, updates, or support.
Recorded audio, imported samples, and project data are stored in the app’s local container and are not sent outside the device without user action. When sharing or exporting, the user chooses the destination.
The linked Terms of Use and Privacy Policy pages are currently provided in Japanese.
12
Data specs
These values match the app’s import, recording, save, and export limits. A file may still fail to load if it is damaged, empty, protected, or unsupported by the device.
| Item | Specification | Notes |
|---|---|---|
| Supported formats | iOS-readable audio, WAV, AIFF, MP3, MPEG-4 Audio | Select one audio file from the file picker. |
| File size | Up to 20MB | Files larger than 20MB cannot be imported. |
| Channels | Up to 2ch | Mono and stereo files are supported. |
| Import duration | Free plan: up to 10 seconds Premium plan: up to 60 seconds | Shorten longer files before importing. |
| Empty files | Not supported | Audio files with zero length cannot be imported. |
| Item | Specification | Notes |
|---|---|---|
| Recording duration | Free plan: up to 10 seconds Premium plan: up to 30 seconds | If the current pad already has a sample, REC asks whether to start recording. The sample remains unchanged until you choose “Use this recording” after recording. |
| Temporary recording format | CAF | This is used internally while recording. |
| Sample rate | 44.1kHz | Used when saving microphone recordings. |
| Item | Specification | Notes |
|---|---|---|
| Pads | 16 pads per bank / up to 4 banks and 64 pads | The free plan can use the upper 8 pads in Bank A. |
| Sequence length | 1 Bar = 16 steps Free plan: 2 Bars Premium plan: up to 8 Bars | Up to 128 steps are available. |
| BPM | 40 to 300 | Change it with TAP or BPM controls. |
| Swing | 0% / 25% / 50% / 75% | SWING cycles in 25% increments. |
| Pad name | Up to 32 characters | Long names are limited when saved. |
| Project name | Up to 48 characters | Names may be sanitized for file compatibility. |
| Item | Specification | Notes |
|---|---|---|
| Project archive | Up to 512MB | Limit for imported project files. |
| WAV export | Premium feature | Run it from EXPORT WAV in PROJECT mode. |
| Export loop count | 1 to 32 loops | Choose how many times the sequence repeats in the exported audio. |
| Export format | WAV / 44.1kHz / 2ch | Creates the full sequence as a stereo WAV file. |
| Effects ON | Adds a 2-second tail | Preserves delay, reverb, and other effect decay. |
| Effects OFF | Exact sequence length | Exports without extra silence. |
13
Errors
This list contains only app-defined fixed text and message templates whose path from the program to an on-screen alert or error field was confirmed. “{details}” is text supplied by iOS or a framework; “{PAD number},” “{PAD list},” and “{value}” change at runtime. Some sample-import failures display an iOS error description without modification, so those bodies cannot be listed as fixed messages. Confirmation dialogs, instructions, and success messages are excluded.
| Displayed message | Meaning | What to do |
|---|---|---|
| Display location: AUDIO ERROR alert | ||
| 音声ファイルを読み込めません。別のファイルを選択してください。 | The selected file could not be opened as audio. | Choose another audio file, or convert it to a supported format such as WAV, AIFF, MP3, or MPEG-4 Audio. |
| 空の音声ファイルは読み込めません。 | The file has no playable audio data. | Choose an audio file with audible length. |
| ファイルサイズは {value}MB 以下にしてください。 | The audio file exceeds the size limit. | Reduce the file size and import it again. |
| サンプル長は {value} 秒以下にしてください。 | The sample is longer than the import limit. | Edit the file to fit within the limit. The free plan supports up to 10 seconds; Premium supports up to 60 seconds for import. |
| 無料プランでは10秒まで読み込めます。60秒まで読み込むにはプレミアムプランが必要です。 | The file exceeds the free plan import duration. | Use a file up to 10 seconds, or enable Premium. |
| チャンネル数は {value}ch までに制限してください。 | The audio file has too many channels. | Convert the file to mono or stereo. |
| サンプルを保存できませんでした。{details} | The imported audio could not be saved to the pad. | Check storage, file access, and file format, then try another file if needed. |
| {PAD list} のサンプルを音声再生用に準備できませんでした。サンプルを読み込み直してください。 | The listed saved samples could not be prepared for playback. | Select those pads and load their audio again with LOAD SAMPLE. |
| 録音を開始できませんでした。録音用オーディオ設定を開始できませんでした。接続中のBluetooth機器やオーディオ出力を外して、もう一度録音してください。 | A connected device prevented the recording audio configuration from starting. | Disconnect Bluetooth and external audio output devices, then try again. |
| 録音を開始できませんでした。録音用オーディオ設定を開始できませんでした。録音を開始できませんでした。マイク権限と入力機器を確認してください。 | The recording process could not start. | Check microphone permission and the input device. |
| 録音を開始できませんでした。録音用オーディオ設定を開始できませんでした。{details} | Another error occurred while starting the recording configuration. | Check microphone permission, audio devices, and the displayed details. |
| 録音を開始できませんでした。マイクの使用が許可されていません。iOS設定でTXT samplerのマイクを許可してください。 | Microphone access has not been granted. | Allow TXT sampler to use the microphone in iOS Settings. |
| 録音データを作成できませんでした。入力レベルとマイク権限を確認してください。 | The app could not create usable audio after recording. | Check microphone permission, input level, and recording time, then record again. |
| 音声エンジンを開始できませんでした。アプリを再起動してください。 | The audio engine required for playback could not start. | Quit and restart the app. If using external audio hardware, check that connection too. |
| トリムするサンプルがありません。 | The current pad has no sample to trim. | Import or record a sample first. |
| トリム範囲を変更してからTRIMしてください。 | The trim start and end points have not changed. | Adjust the range on the waveform, then run TRIM. |
| トリム保存に失敗しました。{details} | The trimmed audio could not be saved. | Check storage, shorten the range, or reload the sample and try again. |
| トリムしたサンプルを保存できませんでした。{details} | The trimmed sample reference could not be saved. | Check available storage and try again. |
| パッド名を保存できませんでした。{details} | The pad name could not be saved. | Set the name again. |
| パッド表示設定を保存できませんでした。{details} | The pad name or appearance settings could not be saved. | Apply the setting again. |
| パッドカラーを保存できませんでした。{details} | Pad color changes could not be saved. | Apply the colors again. |
| パッドをコピーできませんでした。{details} | The copied pad data could not be saved. | Check the source and destination pads, then try again. |
| パッドを入れ替えできませんでした。{details} | The swapped pad data could not be saved. | Check the selected pads and try again. |
| パッドを削除できませんでした。{details} | The cleared pad state could not be saved. | Check the selected pad and try again. |
| パッド設定をリセットできませんでした。{details} | The pad reset could not be completed. | Try again. If it does not improve, restart the app. |
| シーケンスを保存できませんでした。{details} | The sequence, BPM, or related state could not be saved. | Wait briefly and try again. Stop playback before switching projects. |
| シーケンス設定を保存できませんでした。{details} | A sequence setting could not be saved. | Change the setting again and confirm that it is saved. |
| パッド設定を保存できませんでした。{details} | Pad audio parameters could not be saved. | Apply the setting again. |
| マスター設定を保存できませんでした。{details} | Master settings could not be saved. | Apply the setting again. |
| シーケンスJSONを読み込めませんでした。{details} | The selected JSON could not be imported as a sequence. | Check that it is a JSON file exported from TXT sampler or a compatible file. |
| シーケンスJSONを書き出せませんでした。{details} | The sequence JSON could not be created or shared. | Check storage and the share destination, then try again. |
| オーディオを書き出せませんでした。{details} | Sequence WAV export failed. | Check storage and export settings, then try again. |
| シーケンスを復旧用スナップショットから復元しました。 | The app used recovery data because the normal sequence data could not be read. | Check the sequence and save the project again. |
| シーケンスを復元できませんでした。空のパターンで表示しています。 | The sequence could not be recovered and is shown empty. | Recreate the sequence. |
| PAD {PAD number}の設定を復旧用スナップショットから復元しました。 | The app used recovery settings for this pad. | Check the pad and save the project again. |
| PAD {PAD number} の設定を復元できませんでした。既定値で表示しています。 | The pad settings could not be recovered and defaults are shown. | Configure the pad again. |
| PAD {PAD number} のサンプルファイルが見つかりません。 | The saved sample file is missing. | Load the sample into that pad again. |
| マスター設定を復旧用スナップショットから復元しました。 | The app used recovery data for the master settings. | Check the settings and save the project again. |
| マスター設定を復元できませんでした。既定値で表示しています。 | The master settings could not be recovered and defaults are shown. | Configure the master settings again. |
| Display location: PROJECT alert | ||
| プロジェクトを初期化できませんでした。{details} | Project setup failed during app launch. | Restart the app. |
| プロジェクトを作成できませんでした。{details} | A new project could not be saved. | Check available storage and try again. |
| プロジェクトを開けませんでした。{details} | The selected project could not be opened. | Open another project and try repair if needed. |
| プロジェクトをコピーできませんでした。{details} | The project could not be duplicated. | Check available storage and try again. |
| プロジェクトを削除できませんでした。{details} | The project could not be deleted. | Check the selected project and try again. |
| プロジェクトを読み込めませんでした。{details} | The project archive could not be imported. | Check the file and available storage. |
| プロジェクトを修復できませんでした。{details} | Project repair failed. | Restart the app and try again. |
| プロジェクト名を保存できませんでした。{details} | The project name could not be saved. | Use a shorter name and avoid symbols that are difficult to use in filenames. |
| パッド情報を保存できませんでした。{details} | Missing pad records could not be created and saved. | Restart the app and try again. |
| 書き出すWAVファイルがありません。 | No WAV file was available to share after export. | Run EXP WAV again. |
| 初期化できませんでした。{details} | FACTORY RESET could not be completed. | Restart the app and try again. |
| Display location: red text on the Premium screen | ||
| 購入情報を取得できませんでした。通信状態を確認して、もう一度お試しください。 | Premium purchase information could not be fetched. | Check the network connection and try again later. |
| 購入情報を取得できませんでした。{details} | An error occurred while loading product information. | Check the details and network, then reload. |
| 購入は承認待ちです。承認後に自動で反映されます。 | The purchase is waiting for approval. | Wait until approval completes. |
| 購入結果を確認できませんでした。 | The App Store returned an unrecognized purchase result. | Check the network and purchase state. |
| 購入を完了できませんでした。{details} | The purchase could not be completed. | Check the Apple Account, payment method, and network connection, then try again. |
| 復元できるプレミアムプランが見つかりませんでした。 | No restorable Premium purchase was found for the current Apple Account. | Sign in with the same Apple Account used for purchase, then restore again. |
| 購入を復元できませんでした。{details} | Purchase restore failed. | Check the network connection and try again later. |
| 検証できない購入情報がありました。通信状態を確認して、購入を復元してください。 | The current entitlement could not be verified. | Check the network and restore purchases. |
| 購入情報を検証できませんでした。購入を復元してください。 | An updated transaction could not be verified. | Restore purchases. |
| Display location: orange warning in MIDI settings | ||
| MIDI機器へ接続できませんでした。({details})再接続を待っています。 | The app could not connect to a MIDI input device. | Check cables, hubs, power, and Bluetooth MIDI connection. Device-specific configuration and compatibility are outside support scope. |
The default project sounds use CC0-licensed materials published on Freesound.
Use the support form for bugs, usage questions, feedback, and feature requests. Do not include personal information such as your name or email address. We do not answer questions about external MIDI device specifications, configuration, connection methods, or individual compatibility. Reports of issues believed to be caused by the App are accepted. Individual replies, fixes, adoption of requests, and response deadlines are not guaranteed; submissions may be used to improve the FAQ, future updates, and product quality.
Open support form Back to start